 Save
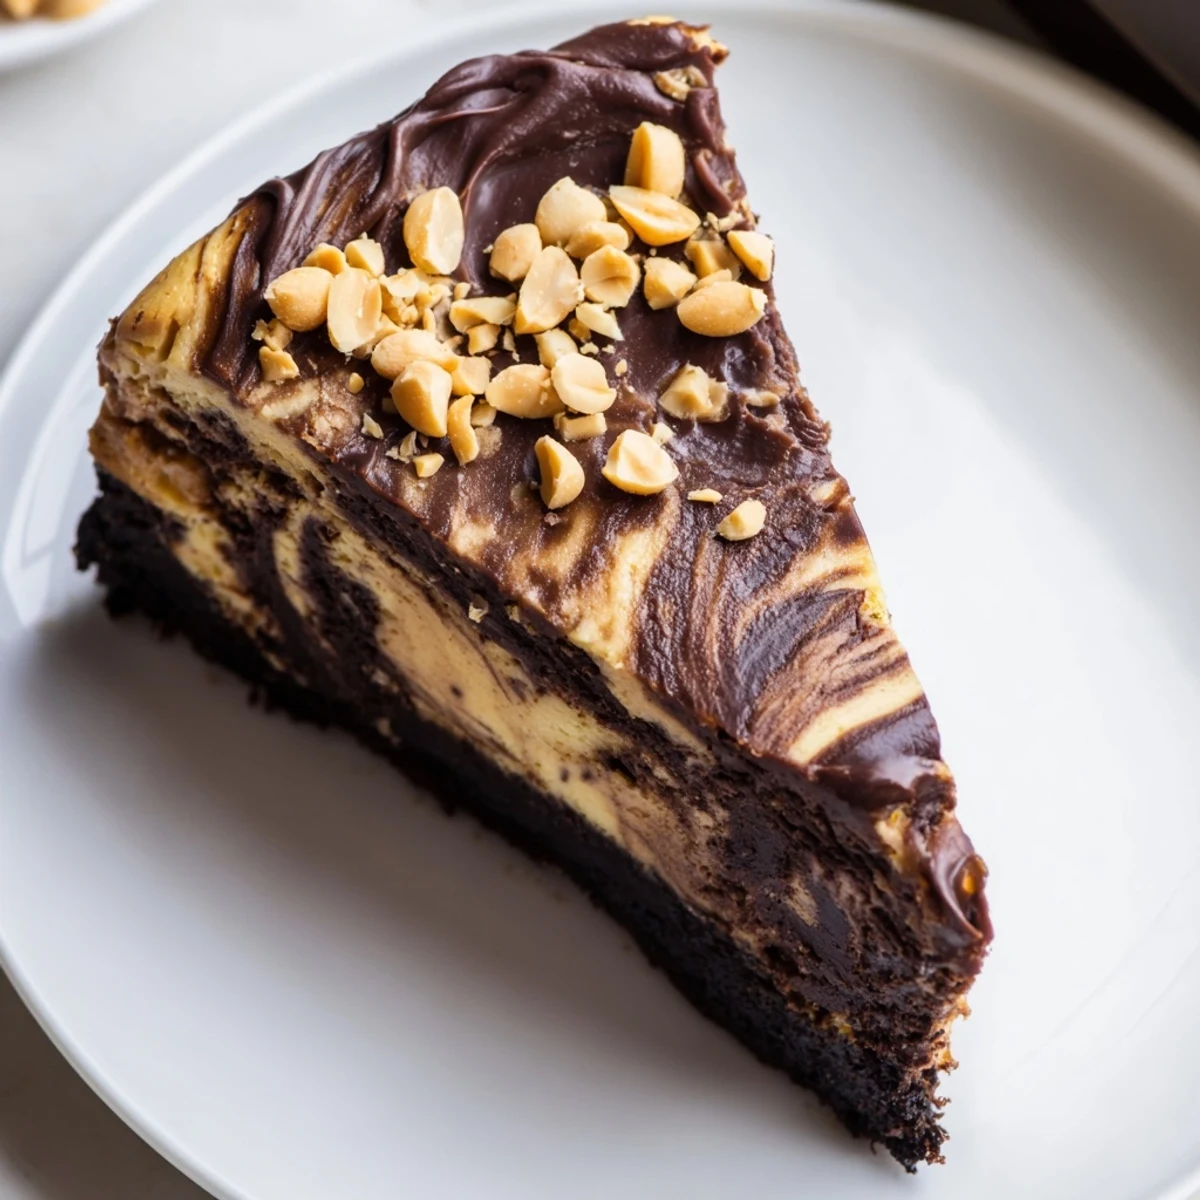
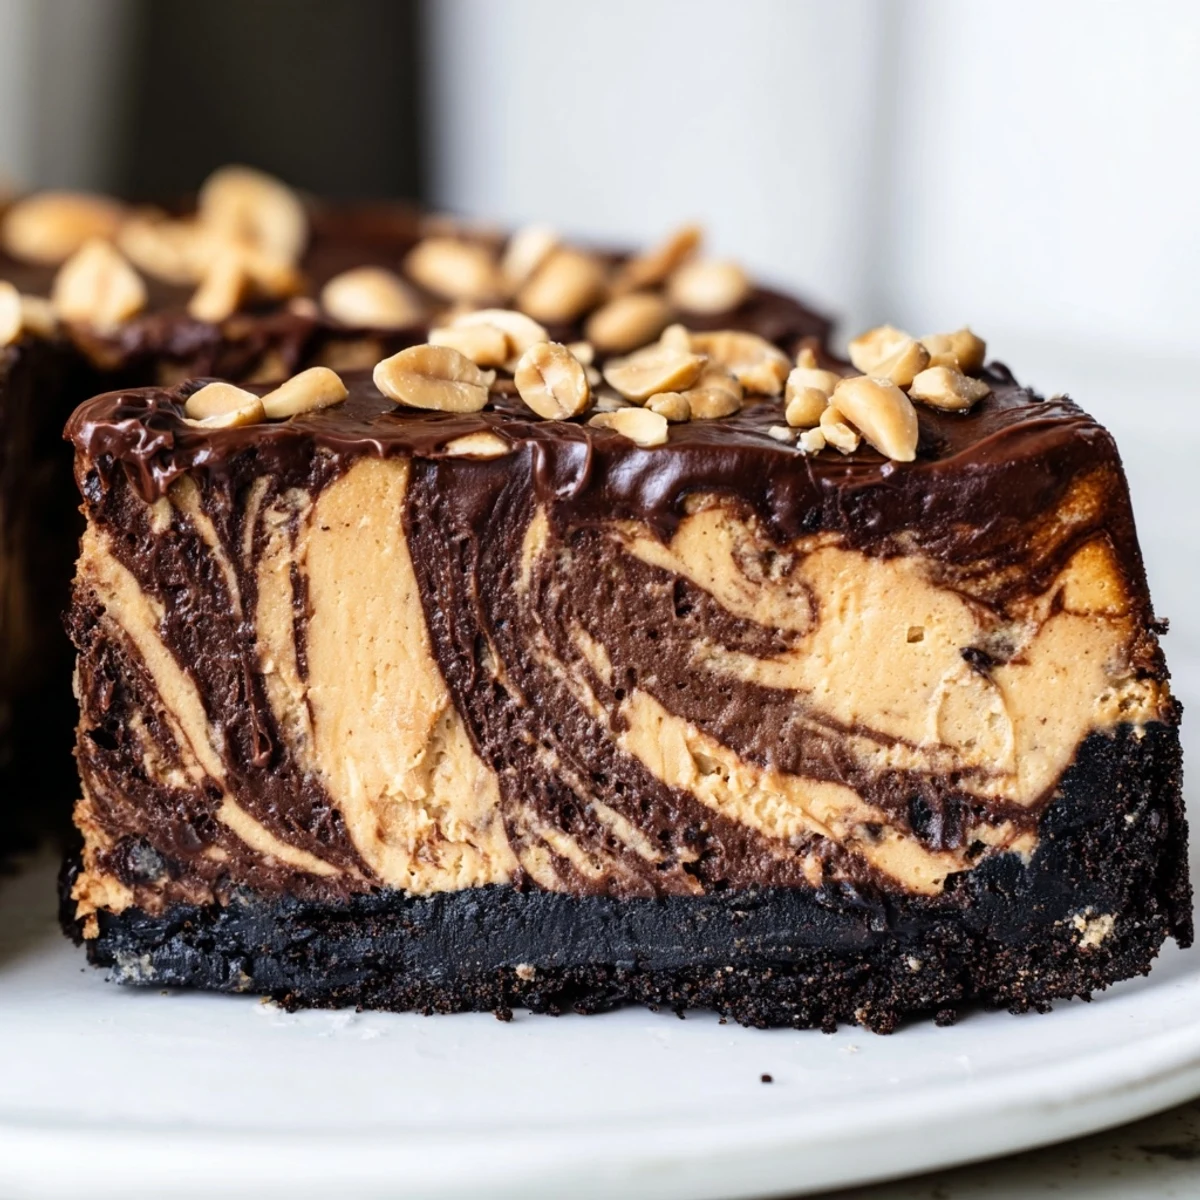
Save This chocolate peanut butter cheesecake brings together two beloved flavors in one showstopping dessert. A buttery chocolate cookie crust forms the base, topped with a swirled filling of creamy peanut butter and rich dark chocolate batters.
Baked low and slow for that perfect creamy texture, then chilled until set, it's finished with a glossy chocolate peanut butter ganache and a sprinkle of roasted peanuts. Plan ahead for the chilling time — it's worth the wait.
My sister walked into the kitchen while I was melting chocolate for this cheesecake and declared she was moving in if it tasted even half as good as it smelled. That was three years ago, and every birthday since, she calls to remind me that chocolate peanut butter cheesecake is nonnegotiable. The combination sounds almost too indulgent on paper, but the tang of cream cheese and sour cream keeps everything grounded. It is the kind of dessert that turns a regular Sunday into an event.
I brought this to a potluck once and watched a quiet guest go back for thirds before anyone else had finished their first piece. He cornered me later to ask if I would consider making it for his engagement party. I said yes before he even finished the sentence, because when a dessert creates that kind of reaction, you do not ask questions.
Ingredients
- Chocolate sandwich cookies (200 g): Standard Oreos work perfectly, and you do not even need to remove the filling, the whole cookie gets crushed together into a wonderfully dark, fudgy base.
- Unsalted butter (60 g), melted: Holds the crust together and adds a richness that salted butter can sometimes overpower.
- Cream cheese (600 g), softened: Cold cream cheese will leave you with lumps you cannot fix, so let it sit out for at least an hour until it presses easily under your fingers.
- Smooth peanut butter (200 g): Use a commercial brand like Skippy or Jif for baking, natural peanut butters tend to separate and make the filling greasy.
- Granulated sugar (200 g): Balances the slight bitterness of dark chocolate and the saltiness of peanut butter.
- 3 large eggs: Room temperature eggs incorporate more smoothly and help the cheesecake puff evenly without cracking.
- Vanilla extract (1 tsp): A quiet background note that makes both the chocolate and peanut butter taste more like themselves.
- Sour cream (120 ml): This is the secret to a creamy, dense texture that never feels heavy or cloying.
- Dark chocolate (100 g for filling, 120 g for topping), melted: Go for something around 60 to 70 percent cacao, dark enough to taste like chocolate but not so intense that it fights the peanut butter.
- Heavy cream (120 ml): Forms the silky base of the ganache topping when heated and poured over chopped chocolate.
- Creamy peanut butter (2 tbsp, for topping): Swirled into the warm ganache, it adds a subtle peanut butter ribbon on every bite.
- Chopped roasted peanuts (optional): A scattering of crunch on top that reminds people this is not just any chocolate cheesecake.
Instructions
- Build the crust:
- Crumble the cookies into fine crumbs using a zip top bag and a rolling pin, then mix with melted butter until the texture resembles wet sand. Press firmly and evenly into the bottom of a greased and lined 23 cm springform pan, and bake at 160 degrees Celsius for 10 minutes until fragrant and set.
- Start the filling:
- Beat softened cream cheese and sugar together in a large bowl until completely smooth with no visible specks. Add the peanut butter and mix until fully incorporated, scraping down the bowl once or twice to catch any stubborn patches.
- Add the eggs and flavorings:
- Crack in the eggs one at a time, beating on low speed after each addition so you do not whip too much air into the batter. Stir in the vanilla and sour cream until just combined.
- Split and flavor:
- Divide the batter evenly between two bowls. Fold the melted and slightly cooled dark chocolate into one half, leaving the other half as pure peanut butter filling.
- Layer and swirl:
- Pour the chocolate filling over the cooled crust and spread to the edges. Spoon the peanut batter on top in gentle dollops, then run a butter knife through both layers in wide S shapes to create a loose, organic marble pattern.
- Bake low and slow:
- Bake at 160 degrees Celsius for 50 to 60 minutes, until the edges are puffed and set but the center still wobbles like gelatin when you gently shake the pan. Turn off the oven, crack the door open, and let the cheesecake cool inside for one full hour to prevent cracking.
- Chill thoroughly:
- Transfer the cheesecake to the refrigerator and chill for at least 4 hours, though overnight is even better if you can wait that long. Patience here is what separates a good cheesecake from a great one.
- Make the ganache topping:
- Heat the heavy cream in a small saucepan until it steams but does not boil, then pour it over the chopped chocolate and stir until glossy and smooth. Stir in the peanut butter until it ribbons through the ganache, cool slightly, and spread over the chilled cheesecake. Top with chopped peanuts if using.
 Save
Save There is something about carrying a cheesecake to the table that makes everyone at it sit up a little straighter. The ganache catches the light, the swirls hint at what is underneath, and for a moment nobody reaches for a slice because they are still looking at it.
Getting the Swirl Right
The marble effect is all about restraint. If you overwork the knife, the two batters blend into a muddy brown that still tastes fine but loses that striking visual contrast. Three or four gentle passes through the batter are enough, and always curve back on yourself rather than going in straight lines.
Serving and Pairing Suggestions
This cheesecake is rich enough that small slices go a long way, and a pot of strong coffee or espresso beside it cuts through the sweetness beautifully. A glass of tawny port or a pour of dessert wine also works wonders if you are ending a dinner party on a celebratory note.
Storing Leftovers
Cover the cheesecake tightly and it will keep in the refrigerator for up to five days without losing texture, though in my experience it rarely lasts past day three. The ganache topping firms up in the cold but softens again within minutes at room temperature.
- Let slices sit out for ten minutes before eating so the filling can relax into its creamiest state.
- Freeze individual slices wrapped in foil for up to one month for emergency dessert situations.
- Always use a clean, hot knife between cuts for bakery clean edges.
 Save
Save Every time I make this cheesecake, I think about how a few humble ingredients become something that gathers people around a table and keeps them there. That is the real magic, and it is worth every minute of chilling time.
Recipe FAQs
- → Can I make this cheesecake ahead of time?
-
Yes, this cheesecake actually tastes better when made a day in advance. The flavors meld and the texture firms up beautifully after overnight chilling. It will keep in the refrigerator for up to 5 days covered tightly.
- → How do I prevent cracks in my cheesecake?
-
The key is baking at a low temperature (160°C/325°F) and cooling gradually. Turning off the oven and leaving the cheesecake inside with the door cracked prevents sudden temperature changes. Avoid overmixing the batter, which incorporates too much air.
- → Can I use crunchy peanut butter instead of smooth?
-
Smooth peanut butter is recommended for the filling to achieve that silky, creamy texture. However, crunchy peanut butter can be used for the topping or as a garnish to add texture contrast.
- → How should I store leftover cheesecake?
-
Store leftover cheesecake in the refrigerator, covered with plastic wrap or in an airtight container. It stays fresh for up to 5 days. You can also freeze individual slices wrapped tightly for up to 2 months — thaw overnight in the fridge before serving.
- → What can I substitute for sour cream?
-
Plain Greek yogurt works as a 1:1 substitute for sour cream in this cheesecake. Full-fat yogurt will maintain the closest texture and richness. You can also use crème fraîche if available.
- → Can I make this without a springform pan?
-
A springform pan is ideal for easy removal, but you can use a regular cake pan lined with parchment paper, leaving enough overhang to lift the cheesecake out. Make sure to grease the pan well and cool completely before attempting to remove it.